Tutorial 4 – Neural Control Personalization
Tutorial Developers: Robert Salati, B.J. Fregly Rice Computational Neuromechanics Lab, Rice University
Last Updated: 11/4/2025
Download the files for this tutorial at https://simtk.org/projects/nmsm
The Neural Control Model Personalization tool finds muscle synergies that are as consistent as possible with ID joint moments and, when available, MTP-estimated muscle activations. The NCP tool fits muscle synergies at the level of muscle activations (i.e., after electromechanical delay and activation dynamics) for regions of the body where either all muscle activations are available from the MTP tool (e.g., the right lower extremity) or no muscle activations are available.
The inputs to the NCP tool are a post-JMP OpenSim model as well as data for IK motions, ID loads, muscle–tendon lengths and velocities, muscle moment arms, and, optionally, MTP-calculated muscle activations from one or more motion trials of interest.
Before running NCP:
Open the OpenSim model
UF_Subject_3_reduced_muscles.osimin the OpenSim GUI.Under the Forces tab on the model, explore the muscles available.
Take note of the extra groups added. These are added for organization so that MTP/NCP knows which model muscles to group together in the optimization. The four important groups are:
Activation Muscle Groups – Muscles that we would expect to have similar activation profiles (ie lateral hamstrings; BFSH and BFLH will have similar activations to each other). These groups are used in both MTP and NCP.
Normalized Fiber Length Muscle Groups – Muscles that we would expect to have similar normalized fiber lengths. These groups are used in both MTP and NCP.
Collected EMG Muscle Groups – Muscle groups that we do have experimental EMG data for. These must have the same name as the respective EMG channel name your EMG data file (preprocessed\EMGData\gait_1.sto). These groups are only used in MTP.
Missing EMG Muscle Groups – Muscle groups that we do not have experimental EMG data for. These groups are only used in MTP.
infoThese groups need to be created manually in a text editor such as Notepad++. More information can be found here but we have example groups for lower limb models in the NMSM Article download on SimTK: https://simtk.org/frs/?group_id=2397
Setting up an NCP settings file:
Activate the NMSM GUI in OpenSim by navigating to Tools>User Plugins, and click
rcnlPlugin.dll.With
UF_Subject_3_reduced_muscles.osimselected in the OpenSim GUI, navigate to Tools>Model Personalization>Neural Control Personalization.a. The following window should be opened:
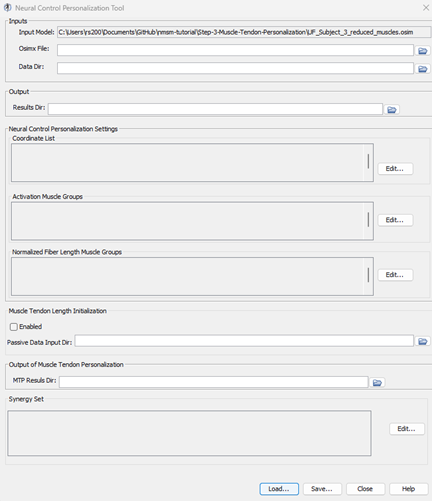
Set the input Osimx file to
mtpResults\UF_Subject_3_reduced_muscles_mtp.osimxSet the data directory to
preprocessed.Set the results directory to
NCPResultsV1.For the coordinate list, select:
hip_flexion_r, knee_angle_r, ankle_angle_rFor activation muscle groups, select
HipFlexorsActivationGroupR, GlutmaxActivationGroupR, HamslatActivationGroupR, VasActivationGroupR, GasActivationGroupRtipThe filter box at the top is very helpful to filter muscle groups.
For normalized fiber length groups, select
GlutmaxNormalizedFiberLengthGroupR, HamsNormalizedFiberLengthGroupR, VasNormalizedFiberLengthGroupR, GasNormalizedFiberLengthGroupRKeep Muscle Tendon Length Initialization disabled.
Set the MTP results directory to
mtpResultsInclude RightLeg in the synergy set with 3 synergies.
Save this settings file as
NCPSettingsV1.xmlOpen
NCPSettingsV1.xmlin a text editor of your choice and explore the settings file.
Running NCP:
Open MATLAB and open
runNCP.min your tutorial directory.Open the project file
Project.prjinside your installation ofnmsm-core.Run the MATLAB section labelled
Run NCP V1a. With the section selected, press shift+enter to run a section.
Post NCP Analysis:
Look through the plots created by the script. If everything was done correctly, there should be 3 plots.
Plot 1 – Muscle Activations: Muscle activations produced by NCP synergies compared to the input MTP muscle activations.
Plot 2 – Synergy Matching Quality: Variance accounted for (VAF) and root mean squared error (RMSE) for the synergy decomposition of muscle activations.
Plot 3 – Joint Moment Matching: Joint moments generated by muscle forces compared to Inverse Dynamics joint moments
Experiment with different numbers of synergies:
Create a copy of
NCPSettingsV1.xmland name itNCPSettingsV2.xmlOpen
NCPSettingsV2.xmlin a text editor of your choice.Change
<results_directory>toNCPResultsV2.Inside
<RCNLSynergySet>, change<num_synergies>to 4.Save this settings file as
NCPSettingsV2.xmlRun the MATLAB section labelled
Run NCP V2a. With the section selected, press shift+enter to run a section.
Experiment with activation minimization:
Create a copy of
NCPSettingsV1.xmland name itNCPSettingsV3.xmlOpen
NCPSettingsV3.xmlin a text editor of your choice.Change the
<results_directory>toNCPResultsV3.Inside
<RCNLCostTermSet>, change<is_enabled>to false for theactivation_trackingterm.Inside
<RCNLCostTermSet>, change<is_enabled>to true for theactivation_minimizationterm.Save this settings file as
NCPSettingsV3.xmlRun the MATLAB section labelled
Run NCP V3a. With the section selected, press shift+enter to run a section.