Tutorial 3 – Muscle-tendon Personalization
Tutorial Developers: Robert Salati, B.J. Fregly, Rice Computational Neuromechanics Lab, Rice University
Last Updated: 11/4/2025
The Muscle–tendon Model Personalization tool finds an optimal set of subject-specific muscle–tendon properties and muscle activations from EMG, joint kinematic, and joint moment data by balancing optimization cost function terms related to muscle properties, similarity of properties among grouped muscles, and matching of EMG-driven and experimental inverse dynamics joint moments. Muscle activation and force predictions are sensitive to optimal muscle fiber length and tendon slack length. Therefore, reliable personalization of these parameters is essential for generating reliable predictions of muscle activations and forces during predictive simulations of movement.
Add more detail on SynX and MTLI
MTP makes use of two sub-tools to get the best personalization - Synergy Extrapolation (SynX) and Muscle-tendon Length Initialization (MTLI). SynX uses muscle synergies from muscles with available EMG data to predict muscle activations for muscles without available EMG data. SynX happens in parallel to the main MTP optimization. SynX is important to ensure that muscle force estimates for all muscles are correct and that muscles aren't being ignored because they don't have EMG data. MTLI uses passive joint moment data to calibrate muscle-tendon length parameters and max isometric forces. It uses passive joint moment data to remove the effects of activation dynamics, thus isolating force and length parameters. MTLI is a precursor to the main MTP optimization, and mostly serves to get a better initial guess for MTP.
The inputs to the MTP tool are a post-JMP OpenSim model as well as processed EMG data, IK motion, ID load, muscle–tendon length and velocity, and muscle moment arm data from one or more motion trials of interest.
Before running MTP:
Open the OpenSim model
UF_Subject_3_reduced_muscles.osimin the OpenSim GUI.Under the Forces tab on the model, explore the muscles available.
Take note of the extra groups added. These are added for organization so that MTP/NCP knows which model muscles to group together in the optimization. The four important groups are:
Activation Muscle Groups – Muscles that we would expect to have similar activation profiles (ie lateral hamstrings; BFSH and BFLH will have similar activations to each other)
Normalized Fiber Length Muscle Groups – Muscles that we would expect to have similar normalized fiber lengths.
Collected EMG Muscle Groups – Muscle groups that we do have experimental EMG data for. These must have the same name as the respective EMG channel name your EMG data file (preprocessed\EMGData\gait_1.sto)
Missing EMG Muscle Groups – Muscle groups that we do not have experimental EMG data for.
infoThese groups need to be created manually in a text editor such as Notepad++. More information can be found here but we have example groups for lower limb models in the NMSM Article download on SimTK: https://simtk.org/frs/?group_id=2397
Setting up an MTP settings file:
Activate the NMSM GUI in OpenSim by navigating to Tools>User Plugins, and click
rcnlPlugin.dll.With
UF_Subject_3_reduced_muscles.osimselected in the OpenSim GUI, navigate to Tools>Model Personalization>Muscle-tendon Personalization.a. The following window should be opened:
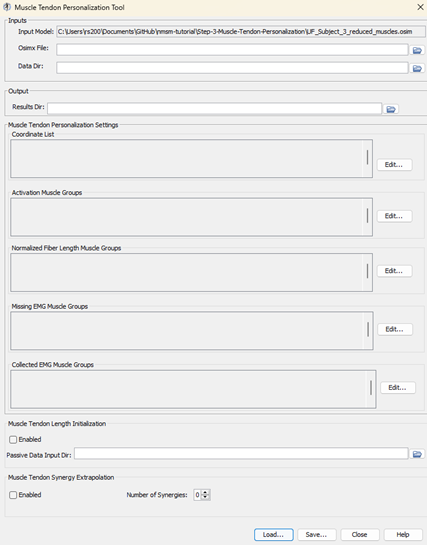
Leave the Osimx File field empty. This tool outputs an Osimx file, but we do not have one to work with yet. If this field is filled out, the MTP tool will concatenate new elements to the existing Osimx file.
Set the data directory to
preprocessedSet the results directory to
MTPResultsV1For the coordinate list, select
hip_flexion_r, knee_angle_r, ankle_angle_rFor activation muscle groups, select
HipFlexorsActivationGroupR, GlutmaxActivationGroupR, HamslatActivationGroupR, VasActivationGroupR, GasActivationGroupRtipThe filter box at the top is very helpful to filter muscle groups.
For normalized fiber length groups, select
GlutmaxNormalizedFiberLengthGroupR, HamsNormalizedFiberLengthGroupR, VasNormalizedFiberLengthGroupR, GasNormalizedFiberLengthGroupRFor missing EMG muscle groups, select
HipFlexorsMissingEMGChannelGroupFor collected EMG muscle groups, select
GlutMaxLat, RecFem, BicFemLong, BicFemShort, VastMed, GasMed, Sol, TibAntEnableMuscle Tendon Length Initialization (MTLI).Set the passive data input directory to
passive_moment_data.EnableMuscle tendon Synergy Extrapolation (SynX) with3synergies.Save this settings file as
MTPSettingsV1.xml.Open
MTPSettingsV1.xmlin a text editor of your choice and explore the settings file.
Running MTP:
Open MATLAB and open runMTP.m in your tutorial directory.
Open the project file (
Project.prjinside your installation ofnmsm-core).Run the MATLAB section labelled Run MTP V1.
With the section selected, press shift+enter to run a section.
Post MTP Analysis:
Look through the plots created by the script. If everything was done correctly, there should be 6 plots.
Plot 1 – Joint Moment Matching: Joint moments generated by muscle forces (with and without SynX) compared to Inverse Dynamics joint moments.
Plot 2 – Muscle Activations: Muscle excitations and activations (with and without SynX) for all muscles included in the MTP run.
Plot 3 – Normalized Fiber Lengths: Normalized fiber lengths for all muscles included in the MTP run. Red dashed lines at 1.0 and 0.6 indicate the optimal working range for muscles.
Plot 4 – Muscle Force: The active, passive, and total force generated by each muscle in the MTP run.
Plot 5 – Passive Joint Moment Matching: The passive moment matching achieved by the MTLI optimization.
Plot 6 – Hill-type Muscle Model Parameters: The muscle model parameters for all optimized muscles in this MTP run. These parameters are the primary output of the MTP tool.
Using a text editor, explore UF_Subject_3_reduced_muscles_mtp.osimx in MTPResultsV1. This file is used as an input for the Neural Control Personalization (NCP) tool, and for Treatment Optimization tools if using synergy controls.
Experiment with different numbers of synergies:
Create a copy of
MTPSettingsV1.xmland name itMTPSettingsV2.xml.Open
MTPSettingsV2.xmlin a text editor of your choice.Change
<results_directory>toMTPResultsV2.Inside
<MTPSynergyExtrapolation>, change<number_of_synergies>to 4.Run the MATLAB section labelled
Run MTP V2.
Run MTP without SynX:
Create a copy of
MTPSettingsV1.xmland name itMTPSettingsV3.xmlOpen
MTPSettingsV3.xmlin a text editor of your choice.Change the
<results_directory>toMTPResultsV3.Inside
<MTPSynergyExtrapolation>, change<is_enabled>to false.Save this settings file as
MTPSettingsV3.xml.Run the MATLAB section labelled
Run MTP V3.